
Development#
Here we provide tips in case you want to help with Reaktoro development. Reaktoro is primarily developed using Visual Studio Code on Linux. If you are on Windows, consider using the Windows Subsystem for Linux (WSL) with Ubuntu by following these installation instructions provided by Canonical®.
Installing recommended extensions for Visual Studio Code#
After installing Visual Studio Code, make sure you also install some important extensions:
Try to discover more interesting extensions and get to know the ones above!
Launching Visual Studio Code#
If you are developing Reaktoro, you should use conda as a package and dependency manager. The entire process of installing conda and creating a conda environment called reaktoro containing all Reaktoro dependencies can be found in the Installation using CMake instructions.
To ensure that Visual Studio Code works correctly with the reaktoro conda environment, it is recommended to launch it from the terminal with the reaktoro environment activated. In a terminal, go to the directory where the Reaktoro source code was git cloned, activate the reaktoro conda environment and launch Visual Studio Code using code .. See the complete sequence of commands below:
cd path/to/reaktoro
conda activate reaktoro
code .
Note
By launching Visual Studio Code in this way, it will be aware of the environment variables present when the conda environemt reaktoro is activated, and this will help with both IntelliSense, debugging, and executing Python scripts using Reaktoro.
Ensuring IntelliSense works correctly#
Unfortunately, Visual Studio Code doesn’t automatically detect where all of Reaktoro’s C++ dependencies are located, and you might get error squiggles all over the place because it can’t find header files for those dependencies. To fix this, you should press Ctrl+Shift+P and select C/C++: Edit Configurations (JSON). In the created C/C++ configuration file, consider:
{
    "configurations": [
        {
            "name": "Linux",
            "includePath": [
                "${workspaceFolder}/",
                "${env:CONDA_PREFIX}/**"
            ],
            "defines": [
                "AUTODIFF_ENABLE_IMPLICIT_CONVERSION_REAL=1",
                "REAKTORO_EMBEDDED_DIR=${workspaceFolder}/embedded",
                "REAKTORO_DATABASES_DIR=${workspaceFolder}/embedded/databases",
                "REAKTORO_PARAMS_DIR=${workspaceFolder}/embedded/params"
            ],
            "compilerPath": "${env:CXX}",
            "cStandard": "c17",
            "cppStandard": "c++17",
            "intelliSenseMode": "linux-gcc-x64",
            "compileCommands": "${workspaceFolder}/compile_commands.json"
        }
    ],
    "version": 4
}
This configuration is telling Visual Studio Code to find header files under ${env:CONDA_PREFIX}, which resolves to /home/username/miniconda3/envs/reaktoro. It also tells Visual Studio Code to use the C++ compiler available in the conda environment, ${env:CXX}, instead of the default compiler available on the system.
Note
This is one of the reasons why it’s important to launch Visual Studio Code from the terminal with the reaktoro environment enabled. By doing so, it knows the CONDA_PREFIX and CXX environment variables used in the above configuration.
Creating compilation tasks for Reaktoro#
If you are looking for Ctrl+Shift+B to trigger a Reaktoro build from within Visual Studio Code, then you need a build task. Press Ctrl+Shift+P and select Tasks: Configure Default Build Tasks, then select Create tasks.json file from template and select Others. Replace the contents of the created tasks.json file with:
{
    "version": "2.0.0",
    "tasks": [
        {
            "label": "Build",
            "type": "shell",
            "command": "clear && make -j",
            "options": {
                "cwd": "${workspaceFolder}/build/debug/gcc"
            },
            "group": {
                "kind": "build",
                "isDefault": true
            },
            "problemMatcher": [
                "$gcc"
            ]
        },
        {
            "label": "Build & Test",
            "type": "shell",
            "command": "clear && make -j tests",
            "options": {
                "cwd": "${workspaceFolder}/build/debug/gcc"
            },
            "problemMatcher": [
                "$gcc"
            ]
        }
    ]
}
The configuration above assumes that you have created a build/debug/gcc directory and executed cmake ../../.. -DCMAKE_BUILD_TYPE=Debug from inside of it:
mkdir -p build/debug/gcc
cmake ../../.. -DCMAKE_BUILD_TYPE=Debug
Tip
Consider using the LLVM linker lld, which is faster than the default GNU linker ld, when configuring the build of Reaktoro (for either debug or release modes):
cmake ../../.. -DCMAKE_BUILD_TYPE=Debug -DCMAKE_CXX_FLAGS="-fuse-ld=lld"
Creating run and debug tasks for Reaktoro’s tests and examples#
When doing Reaktoro development, you may want to debug:
a C++ test e.g., the C++ test for class
ChemicalSystemimplemented inChemicalSystem.test.cxxa C++ example e.g., one of these C++ examples
a Python test e.g., the Python test for class
ChemicalSystemimplemented inChemicalSystem.pya Python example e.g., one of these Python examples
Pressing Ctrl+Shift+D in Visual Studio Code allows you to execute and debug an application. You’ll need first to click on create a launch.json and then select any shown option. Once the launch.json file is created, replace its content by:
{
    "version": "0.2.0",
    "configurations": [
        {
            "name": "Debug C++ Tests",
            "type": "cppdbg",
            "request": "launch",
            "program": "${workspaceFolder}/build/debug/gcc/Reaktoro/reaktoro-cpptests",
            "args": ["[ChemicalSystem]"],
            "preLaunchTask": "Build",
            "stopAtEntry": false,
            "cwd": "${workspaceFolder}",
            "environment": [],
            "MIMode": "gdb",
            "setupCommands": [
                {
                    "description": "Enable pretty-printing for gdb",
                    "text": "-enable-pretty-printing",
                    "ignoreFailures": true
                }
            ]
        },
        {
            "name": "Debug C++ Example",
            "type": "cppdbg",
            "request": "launch",
            "program": "${workspaceFolder}/build/debug/gcc/examples/cpp/${fileBasenameNoExtension}",
            "preLaunchTask": "Build",
            "stopAtEntry": false,
            "cwd": "${workspaceFolder}",
            "environment": [],
            "MIMode": "gdb",
            "setupCommands": [
                {
                    "description": "Enable pretty-printing for gdb",
                    "text": "-enable-pretty-printing",
                    "ignoreFailures": true
                }
            ]
        },
        {
            "name": "Debug Python Tests",
            "type": "cppdbg",
            "request": "launch",
            "program": "${env:CONDA_PREFIX}/bin/python",
            "args": ["-m", "pytest", "Reaktoro/Core/ChemicalSystem.py"],
            "preLaunchTask": "Build",
            "stopAtEntry": false,
            "cwd": "${workspaceFolder}",
            "environment": [
                {
                    "name": "PYTHONPATH",
                    "value": "${workspaceFolder}/build/debug/gcc/python/package/build/lib:${env:PYTHONPATH}"
                }
            ],
            "MIMode": "gdb",
            "setupCommands": [
                {
                    "description": "Enable pretty-printing for gdb",
                    "text": "-enable-pretty-printing",
                    "ignoreFailures": true
                }
            ]
        },
        {
            "name": "Debug Python/C++ Script",
            "type": "cppdbg",
            "request": "launch",
            "program": "${env:CONDA_PREFIX}/bin/python",
            "args": ["${file}"],
            "preLaunchTask": "Build",
            "stopAtEntry": false,
            "cwd": "${workspaceFolder}",
            "environment": [
                {
                    "name": "PYTHONPATH",
                    "value": "${workspaceFolder}/build/debug/gcc/python/package/build/lib:${env:PYTHONPATH}"
                }
            ],
            "MIMode": "gdb",
            "setupCommands": [
                {
                    "description": "Enable pretty-printing for gdb",
                    "text": "-enable-pretty-printing",
                    "ignoreFailures": true
                }
            ]
        }
    ]
}
When you press Ctrl+Shift+D, you are taken to the Run and Debug pane. On the top, you should now have a checkbox showing the options:
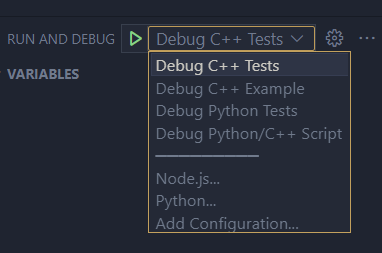
Now you can select one of them and start debugging. You can adjust the above configuration file as needed.
- Debugging different C++ tests
In the
Debug C++ Testsconfiguration, replace[ChemicalSystem]by[EquilibriumSolver]or any other C++ test.- Debugging different C++ examples
Make sure you have the C++ example open in the editor and press
F5. Alternatively, replace${fileBasenameNoExtension}in theDebug C++ Exampleconfiguration above with the name of the C++ example you want to debug so that you don’t need to have the C++ file open at the timeF5is pressed.- Debugging different Python tests
In the
Debug Python Testsconfiguration, replaceReaktoro/Core/ChemicalSystem.pybyReaktoro/Equilibrium/EquilibriumSolver.pyor any other Python test file.- Debugging different Python examples
Make sure you have the Python example open in the editor and press
F5. Alternatively, replace${file}in theDebug Python/C++ Scriptconfiguration above with the path to the Python file you want to debug so that you don’t need to have the Python file open at the timeF5is pressed.Attention
Note that this actually debugs the Reaktoro C++ extension for Python. In other words, this configuration allows you to debug Reaktoro C++ code that is running from a Python script. This is not for debugging a Python script!
Documentation#
A lot of the documentation at https://reaktoro.org is written as Jupyter notebooks here: https://github.com/reaktoro/reaktoro-jupyter-book
To contribute to it you can edit it either on Github directly or by cloning the git repository locally, and then sending pull requests with proposed additions or improvements.